springboot 仅做记录 原文https://blog.didispace.com/spring-boot-learning-2x/
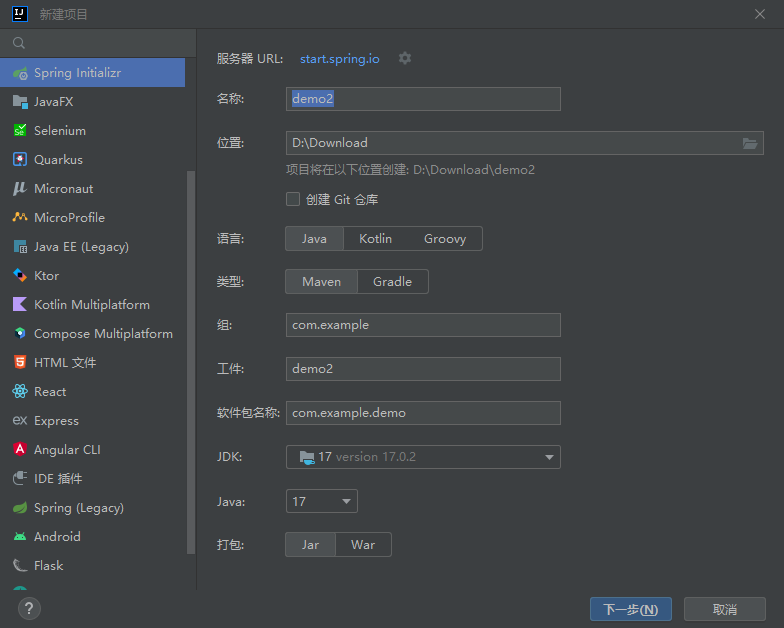
新建项目
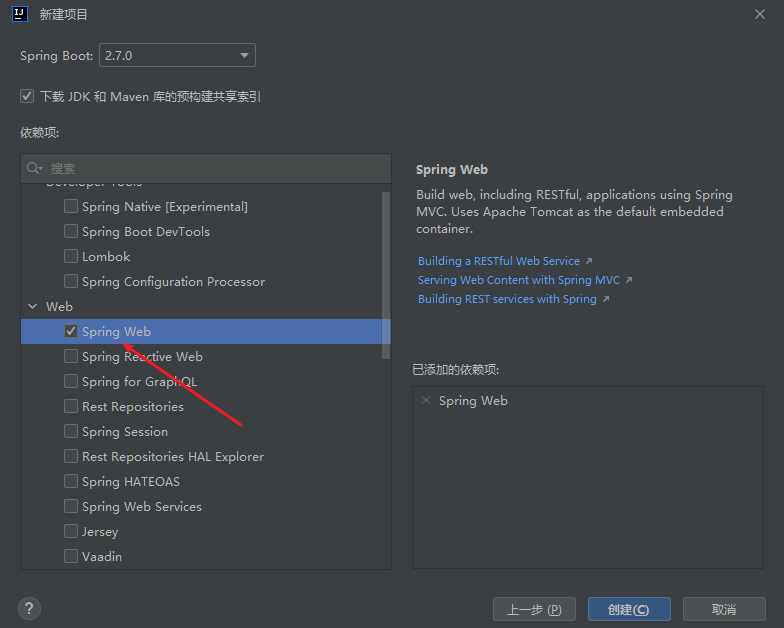
选择spring web
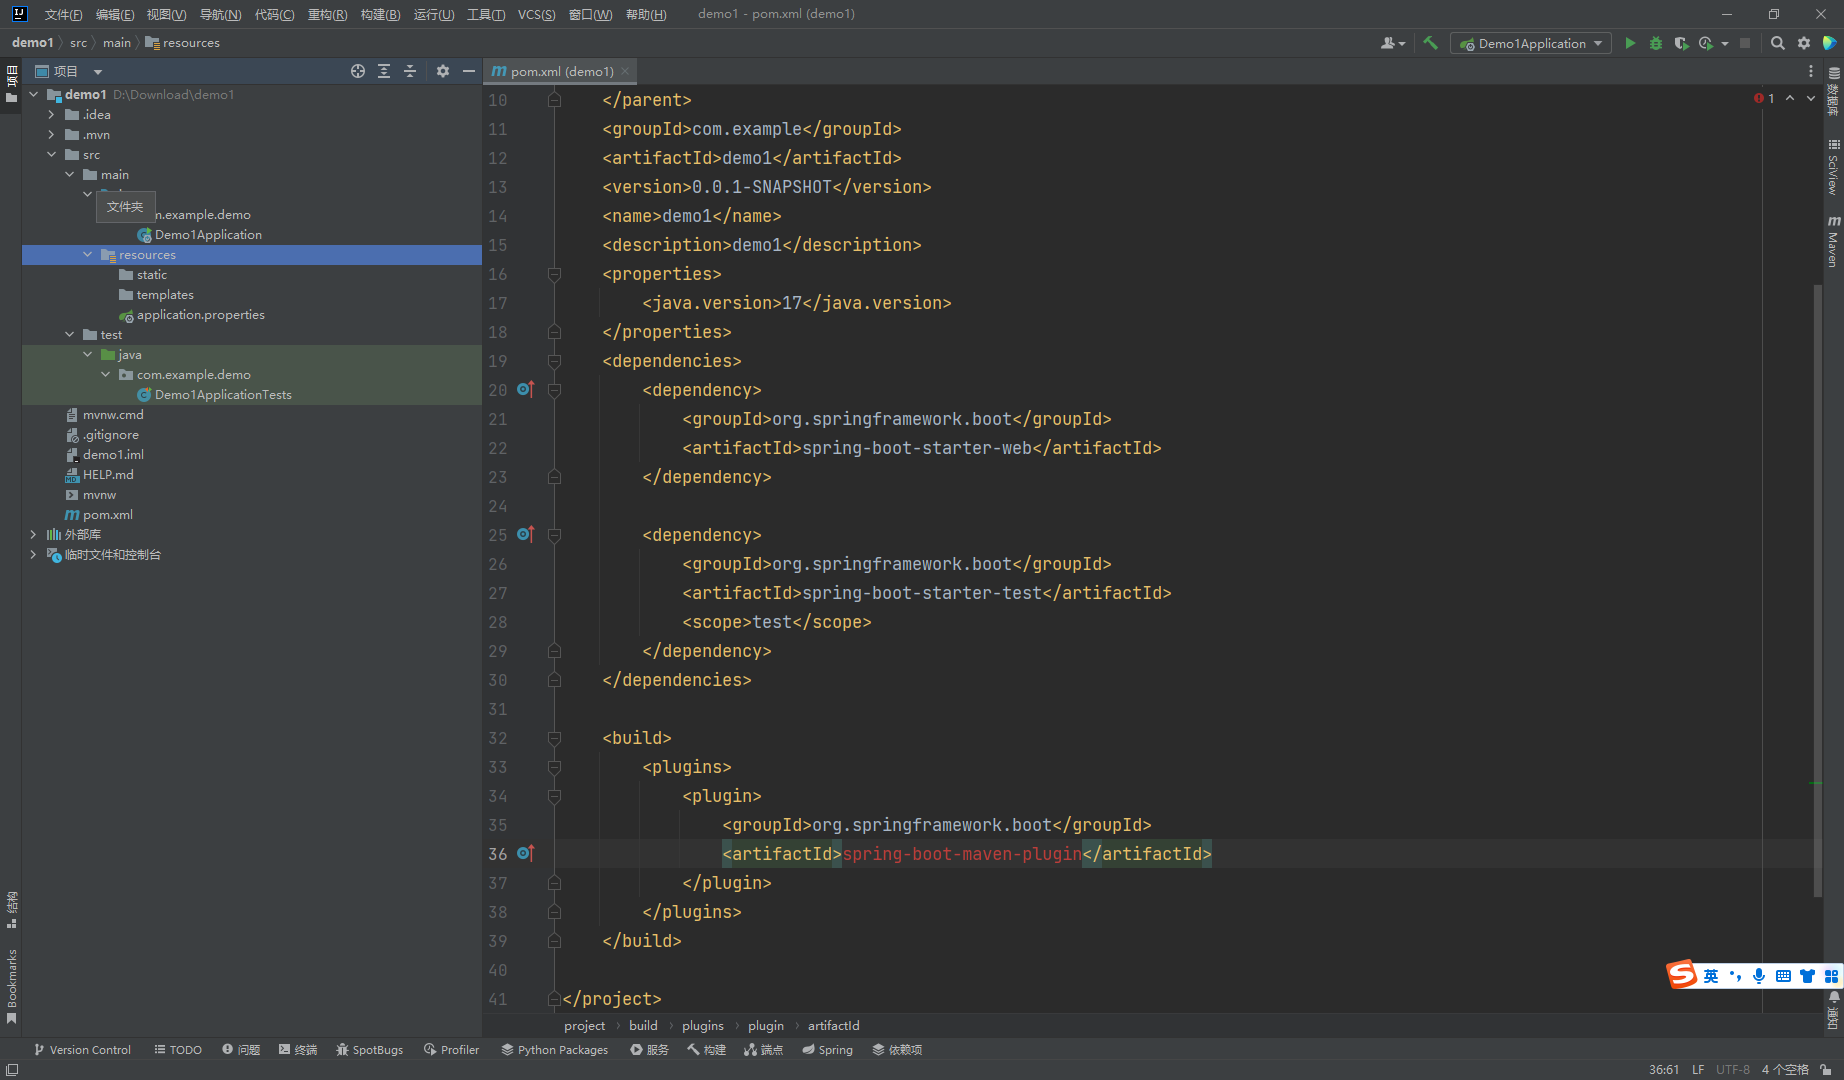
目录结构
src/main/java 下程序入口 Demo1Application
src/main/rescurces下的配置文件 application.properties
src/test/下的测试入口 Demo1ApplicationTests
生成的Demo1Application和Demo1ApplicationTests类都可以直接运行来启动当前创建的项目,由于项目未配置任何参数,程序会在加载完成spring之后结束运行
<?xml version="1.0" encoding="UTF-8"?> <project xmlns ="http://maven.apache.org/POM/4.0.0" xmlns:xsi ="http://www.w3.org/2001/XMLSchema-instance" xsi:schemaLocation ="http://maven.apache.org/POM/4.0.0 https://maven.apache.org/xsd/maven-4.0.0.xsd" > <modelVersion > 4.0.0</modelVersion > <parent > <groupId > org.springframework.boot</groupId > <artifactId > spring-boot-starter-parent</artifactId > <version > 2.7.0</version > <relativePath /> </parent > <groupId > com.example</groupId > <artifactId > demo1</artifactId > <version > 0.0.1-SNAPSHOT</version > <name > demo1</name > <description > demo1</description > <properties > <java.version > 17</java.version > </properties > <dependencies > <dependency > <groupId > org.springframework.boot</groupId > <artifactId > spring-boot-starter-web</artifactId > </dependency > <dependency > <groupId > org.springframework.boot</groupId > <artifactId > spring-boot-starter-test</artifactId > <scope > test</scope > </dependency > </dependencies > <build > <plugins > <plugin > <groupId > org.springframework.boot</groupId > <artifactId > spring-boot-maven-plugin</artifactId > </plugin > </plugins > </build > </project >
有四个部分
项目元数据 创建时候输入的project metadata部分,也就是maven项目的基本元素,包括 groupid artifactid version name description等
parent 继承 spring-boot-starter-parent的依赖管理,控制版本与打包等内容
dependencies 项目具体依赖,这里包含了spring-boot-starter-web 用于实现htpp接口(该依赖中包含了spring mvc) spring-boot-starter-test用于编写单元此时的依赖包
build:构建配置部分.默认使用了spring-boot-maven-plugin,配合spring-boot-starter-parent就可以把spring boot应用打包成jar来直接运行
编写一个http接口 在包com.example.demo下新建一个HelloController类,写入一下内容
package com.wan.an;import org.springframework.web.bind.annotation.RequestMapping;import org.springframework.web.bind.annotation.RestController;@RestController public class HelloController { @RequestMapping("/hello") public String index () { return "Hello World" ; } }
运行主程序 访问
编写单元测试用例 打开src/test/下的测试入口Demo1ApplicationTests类,在下面编写一个简单的单元测试来模拟http请求
package com.example.demo;import org.junit.Before;import org.junit.Test;import org.junit.runner.RunWith;import org.springframework.boot.test.context.SpringBootTest;import org.springframework.http.MediaType;import org.springframework.test.context.junit4.SpringRunner;import org.springframework.test.web.servlet.MockMvc;import org.springframework.test.web.servlet.request.MockMvcRequestBuilders;import org.springframework.test.web.servlet.setup.MockMvcBuilders;import static org.hamcrest.Matchers.equalTo;import static org.springframework.test.web.servlet.result.MockMvcResultMatchers.content;import static org.springframework.test.web.servlet.result.MockMvcResultMatchers.status;@RunWith(SpringRunner.class) @SpringBootTest public class Demo1ApplicationTests { private MockMvc mvc; @Before public void setUp () throws Exception { mvc = MockMvcBuilders.standaloneSetup(new HelloController ()).build(); } @Test public void getHello () throws Exception { mvc.perform(MockMvcRequestBuilders.get("/hello" ).accept(MediaType.APPLICATION_JSON)) .andExpect(status().isOk()) .andExpect(content().string(equalTo("Hello World" ))); } }
使用MockServletContext来构建一个空的WebApplicationContext,这样我们创建的HelloContorller就可以在@Before函数汇总创建并传递到MockMvcBuilders.standaloneSetup()函数中
工程结构推荐 com +- example +- myproject +- Application.java | +- domain | +- Customer.java | +- CustomerRepository.java | +- service | +- CustomerService.java | +- web | +- CustomerController.java |
root package com.example.myproject,所有的类和其他package都在root package之下
应用主类 Application.java,该类之间位于root package下,通常我们会在应用主类中做一下框架配置扫描等配置,我么放在root package下面可以帮助程序减少手工配置来加载到我们希望被spring加载的内容
com.example.myproject.domain 包 用来定义实体映射关系与数据访问相关的接口和实现
com.example.myproject.service 包 用来编写业务逻辑相关的接口和时效内
com.example.myproject.web 用于编写web层相关的实现,比如:spring mvc的Controller
root package与应用主类的位置是整个结构的关键,由于应用主类在root package中,所以按照上面的规则定义的所有其他类都处于root package下的其他子包之后,默认情况下,spring boot 的应用主类都会自动扫描root package以及所有子包下的所有类来进行初始化
就像,假设我们将com.example.myproject.web包与上面所述的root package com.example.myproject放在同一级中,这个应用的主类Application.java 在默认情况下就无法扫描到com.example.myproject.web中定义的Controller定义,就无法初始化Controller中定义的接口
com
  +- example
    +- myproject
      +- Application.java
      |
      +- domain
      |  +- Customer.java
      |  +- CustomerRepository.java
      |
      +- service
      |  +- CustomerService.java
      |
      +- web
      |  +- CustomerController.java
      |
非典型结构下的初始化 如果我们一定要加载非root package中下的内容,
@ComponentScan 使用@ComponentScan注释指定具体的加载包
package com.example.demo;import org.springframework.boot.SpringApplication;import org.springframework.boot.autoconfigure.SpringBootApplication;import org.springframework.context.annotation.ComponentScan;@ComponentScan(basePackages = "com.example") @SpringBootApplication public class Demo1Application { public static void main (String[] args) { SpringApplication.run(Demo1Application.class, args); } }
这种方法通过注释直接指定要扫描的包,比较直观,如果有这样的需求也是可以用的,但是原则上使用典型结构来定义就可以少写一些注释
@Bean 使用@Bean注释来初始化
@SpringBootApplication public class Bootstrap { public static void main (String[] args) { SpringApplication.run(Bootstrap.class, args); } @Bean public CustomerController customerController () { return new CustomerController (); } }
没看懂
配置文件详解 src/main/resources目录时spring boot的配置目录,所以我们要为应用创建配置个性化配置时,就是在该目录之下.
spring boot的默认配置文件的位置为 src/main/resources/application.properties 关于spring boot应用的配置内容都可以集中在该文件中,根据我们引入的不同starter模块,可以在这里定义,容器端口号 数据库的连接信息 日志级别等各种配置信息,比如我们需要自定义web模块的服务端口号,可以在application.properties中添加server.prot=8888来指定端口号为8888,也可以通过spring.application.name=hello来指定应用名
还可以使用yaml来进行配置,yaml还可以在单个文件中通过使用spring.profiles属性来定义多个不同的环境配置.server.port将使用8882端口,而prod环境,server.prot将使用8883端口,如果没有指定环境server.prot将使用8881端口
server:
  port: 8881
---
spring:
  profiles: test
server:
  port: 8882
---
spring:
  profiles: prod
server:
  port: 8883
自定义参数 我们除了可以在spring boot的配置文件中设置各个starter模块中预定义的配置属性,也可以在配置文件中定义一些我们需要的自定义属性,
book.name=SpringCloudInAction
book.author=ZhaiYongchao
然后 在应用中我们可以通过@Value注解来加载这些自定义的参数
package com.example.demo;import org.springframework.beans.factory.annotation.Value;import org.springframework.stereotype.Component;@Component public class Book { @Value("${book.name}") private String name; @Value("${book.author}") private String author; }
@Value注释加载属性值的时候可以支持两种表达式来进行配置
一种是上面的PlaceHolder方式,格式为${..},大括号内为PlaceHolder
另外还可以使用spel表达式,格式为#{..},大括号里面为spel表达式
参数应用 在application.properties中的各个参数之间,我们可以直接通过使用placeHolder的方式来进行引用
book.name=SpringCloud
book.author=ZhaiYongchao
book.desc=${book.author}  is writing《${book.name}》
book.desc参数引用了上文中定义的book.name和book.author属性,最后该属性的值就是ZhaiYongchao is writing《SpringCloud》
使用随机数 在一些情况下,有一些参数我们希望它每次加载的时候不是一个固定的值,比如 密钥,服务端口,在spring boot的属性配置文件中,我们可以通过使用${random}配置来产生随机的int值,long值或者string字符串,这样我们就可以容易的通过配置来随机生成属性,
# 随机字符串
com.didispace.blog.value=${random.value}
# 随机int
com.didispace.blog.number=${random.int}
# 随机long
com.didispace.blog.bignumber=${random.long}
# 10以内的随机数
com.didispace.blog.test1=${random.int(10)}
# 10-20的随机数
com.didispace.blog.test2=${random.int[10,20]}
该配置方式可以也能够在设值应用的端口等场景,避免在本地调试时出现端口冲突
命令行参数 在命令行方式启动spring boot应用时,连续的两个减号 – 就是对application.properties中的属性值进行赋值的表示,所以,java -jar xx.jar –server.port=8888 命令就等于在application.properties中添加属性server.prot=8888
多环境配置 在spring boot 中多环境配置文件名需要满足application-{profile}.properties的格式,其中{profile}对应你的环境表示
application-dev.properties:开发环境
application-test.properties:测试环境
application-prod.properties:生产环境
至于那个具体的配置文件会被加载,需要在application.properties文件汇总通过spring.profiles.active属性来设置,其中对应配置文件中的{profile}值,如spring.profiles.active=test就会加载application-test.properties配置文件内容。
属性的读取 我们如果要在spring 应用程序的environment中读取属性的时候,没一个属性的唯一名称符合以下规则
通过.分离各个元素
最后一个.将前缀与属性名称分开
必须是字母(a-z)和数字(0-9)
必须是小写字母
用连字符-来分隔单词
唯一允许的其他字符是[和],用于List的索引
不能以数字开头
如果我们要读取配置文件中spring.jpa.database-platform的配置可以
this.environment.containsProperty("spring.jpa.database-platform")
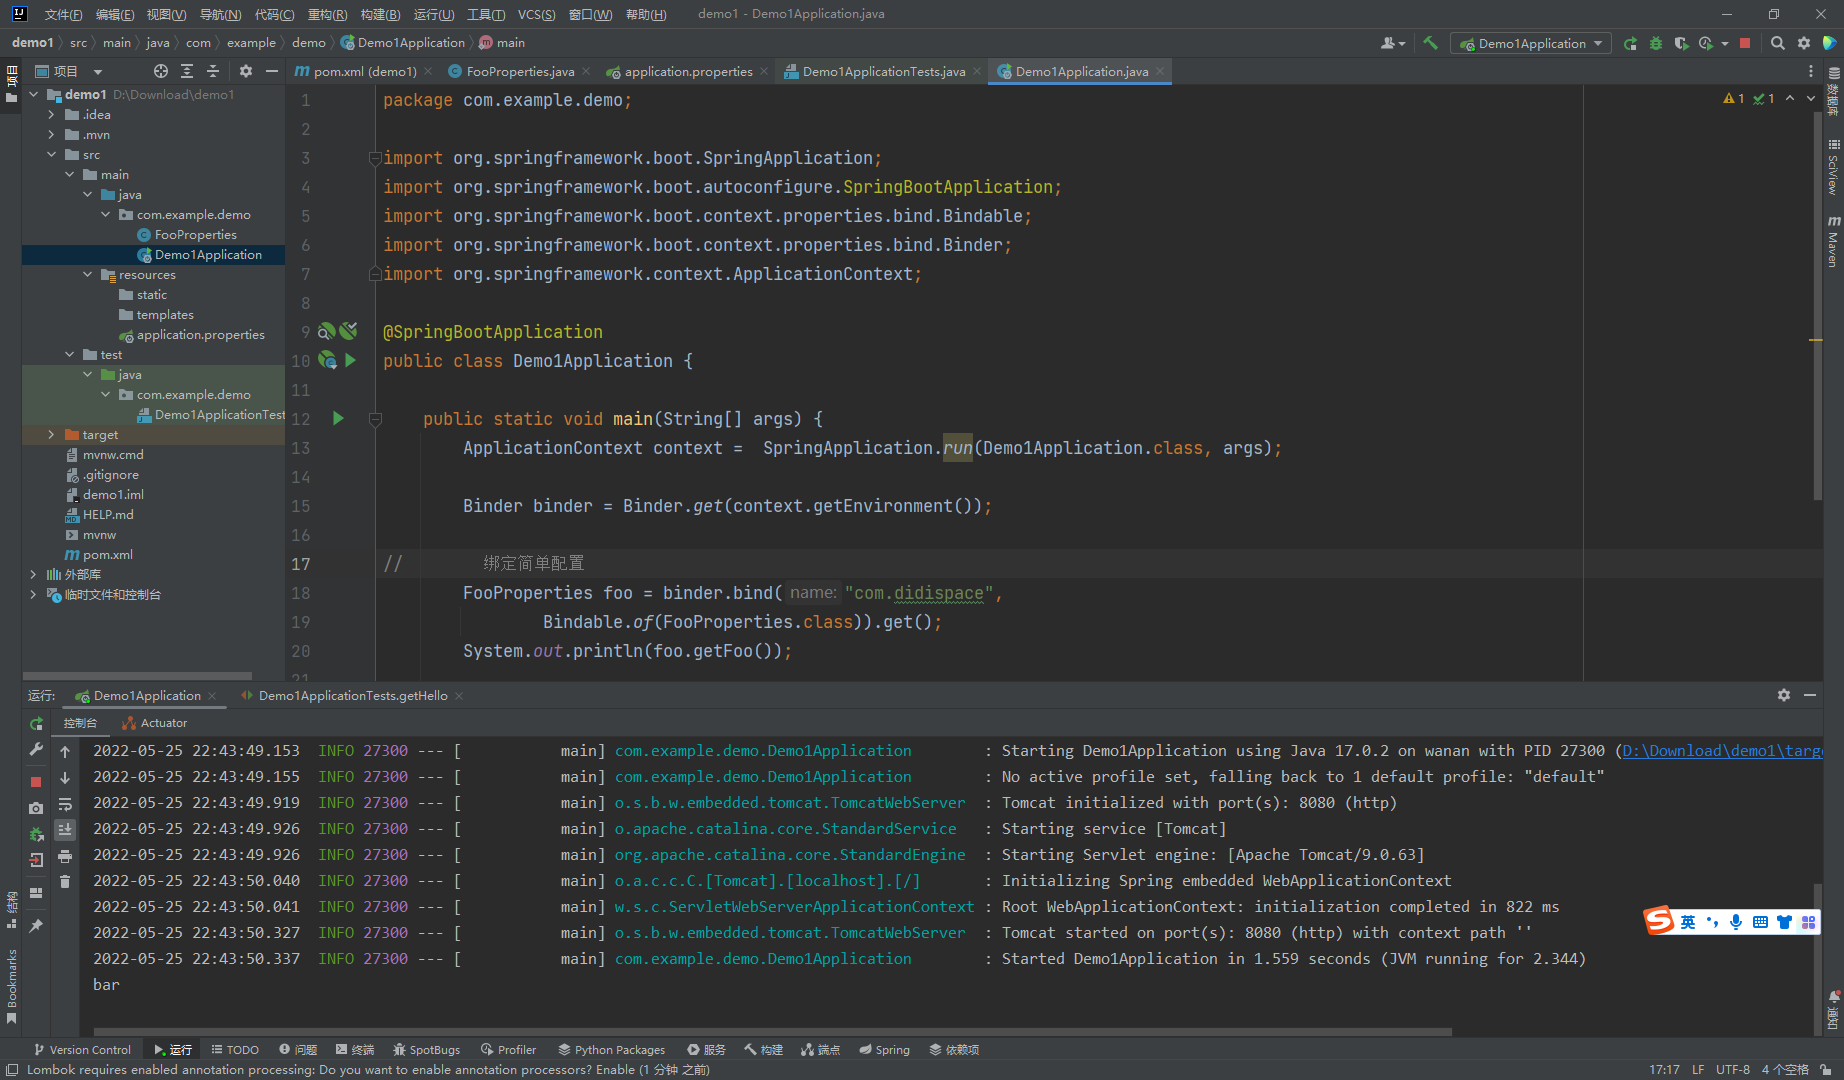
全新的绑定api 在propertes配置中有这样一个配置 com.didispace.foo=bar
我们为他创建对应的配置类,原文这里没加@Component我尝试的时候会爆错
package com.example.demo;import lombok.Data;import org.springframework.boot.context.properties.ConfigurationProperties;import org.springframework.stereotype.Component;@Data @Component @ConfigurationProperties(prefix = "com.didispace") public class FooProperties { private String foo; @Override public String toString () { return "FooProperties{" + "foo='" + foo + '\'' + '}' ; } public String getFoo () { return foo; } public void setFoo (String foo) { this .foo = foo; } }
接下来可以使用Binder就可以这样来拿配置信息了
package com.example.demo;import org.springframework.boot.SpringApplication;import org.springframework.boot.autoconfigure.SpringBootApplication;import org.springframework.boot.context.properties.bind.Bindable;import org.springframework.boot.context.properties.bind.Binder;import org.springframework.context.ApplicationContext;@SpringBootApplication public class Demo1Application { public static void main (String[] args) { ApplicationContext context = SpringApplication.run(Demo1Application.class, args); Binder binder = Binder.get(context.getEnvironment()); FooProperties foo = binder.bind("com.didispace" , Bindable.of(FooProperties.class)).get(); System.out.println(foo.getFoo()); } }
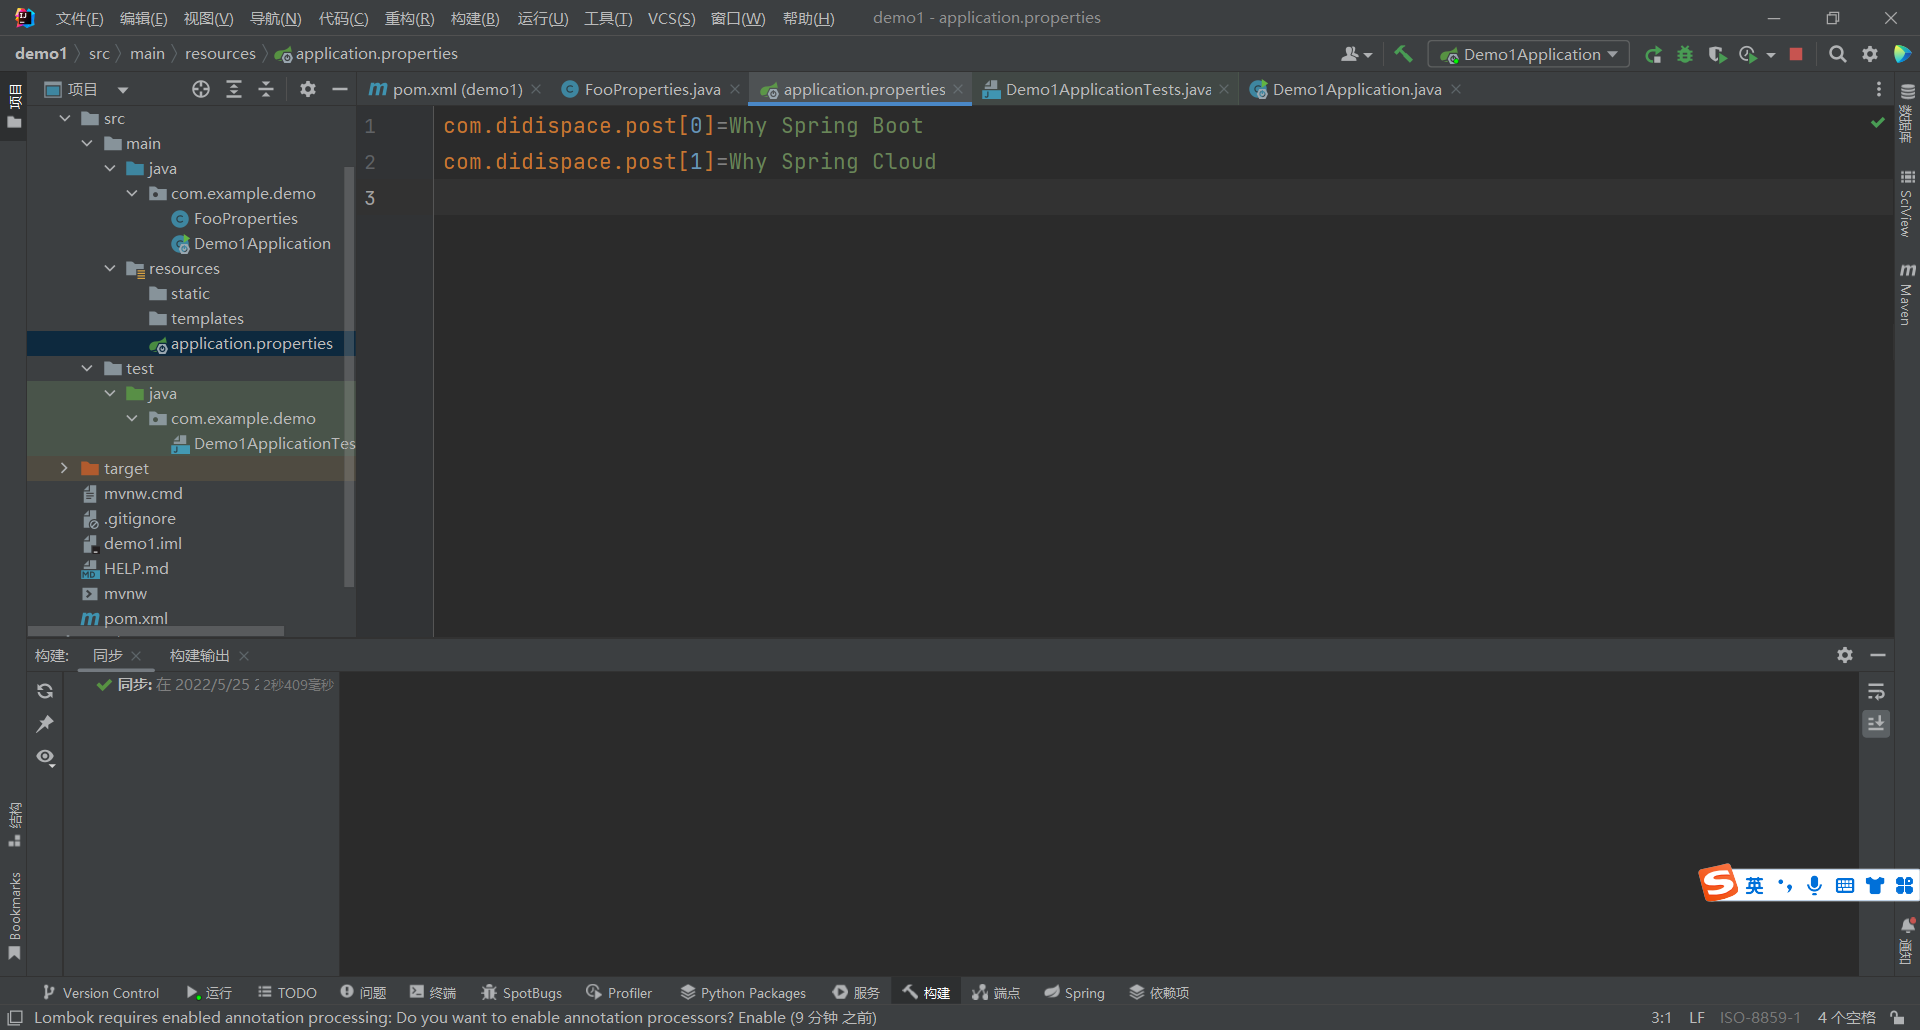
list类型
com.didispace.post[0]=Why Spring Boot
com.didispace.post[1]=Why Spring Cloud

com.didispace.posts[0].title=Why Spring Boot
com.didispace.posts[0].content=It is perfect!
com.didispace.posts[1].title=Why Spring Cloud
com.didispace.posts[1].content=It is perfect too!
ApplicationContext context = SpringApplication.run(Application.class, args);Binder binder = Binder.get(context.getEnvironment());List<String> post = binder.bind("com.didispace.post" , Bindable.listOf(String.class)).get(); System.out.println(post); List<PostInfo> posts = binder.bind("com.didispace.posts" , Bindable.listOf(PostInfo.class)).get(); System.out.println(posts);
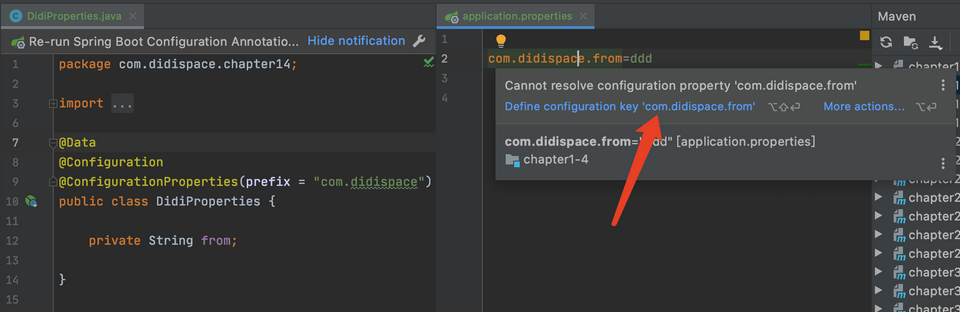
配置元数据的应用 可见这里添加配置的时候idea无法识别
创建一个配置类
package com.example.demo;import lombok.Data;import org.springframework.boot.context.properties.ConfigurationProperties;import org.springframework.context.annotation.Configuration;@Data @Configuration @ConfigurationProperties(prefix = "com.fifispace") public class FooProperties { private String from; }
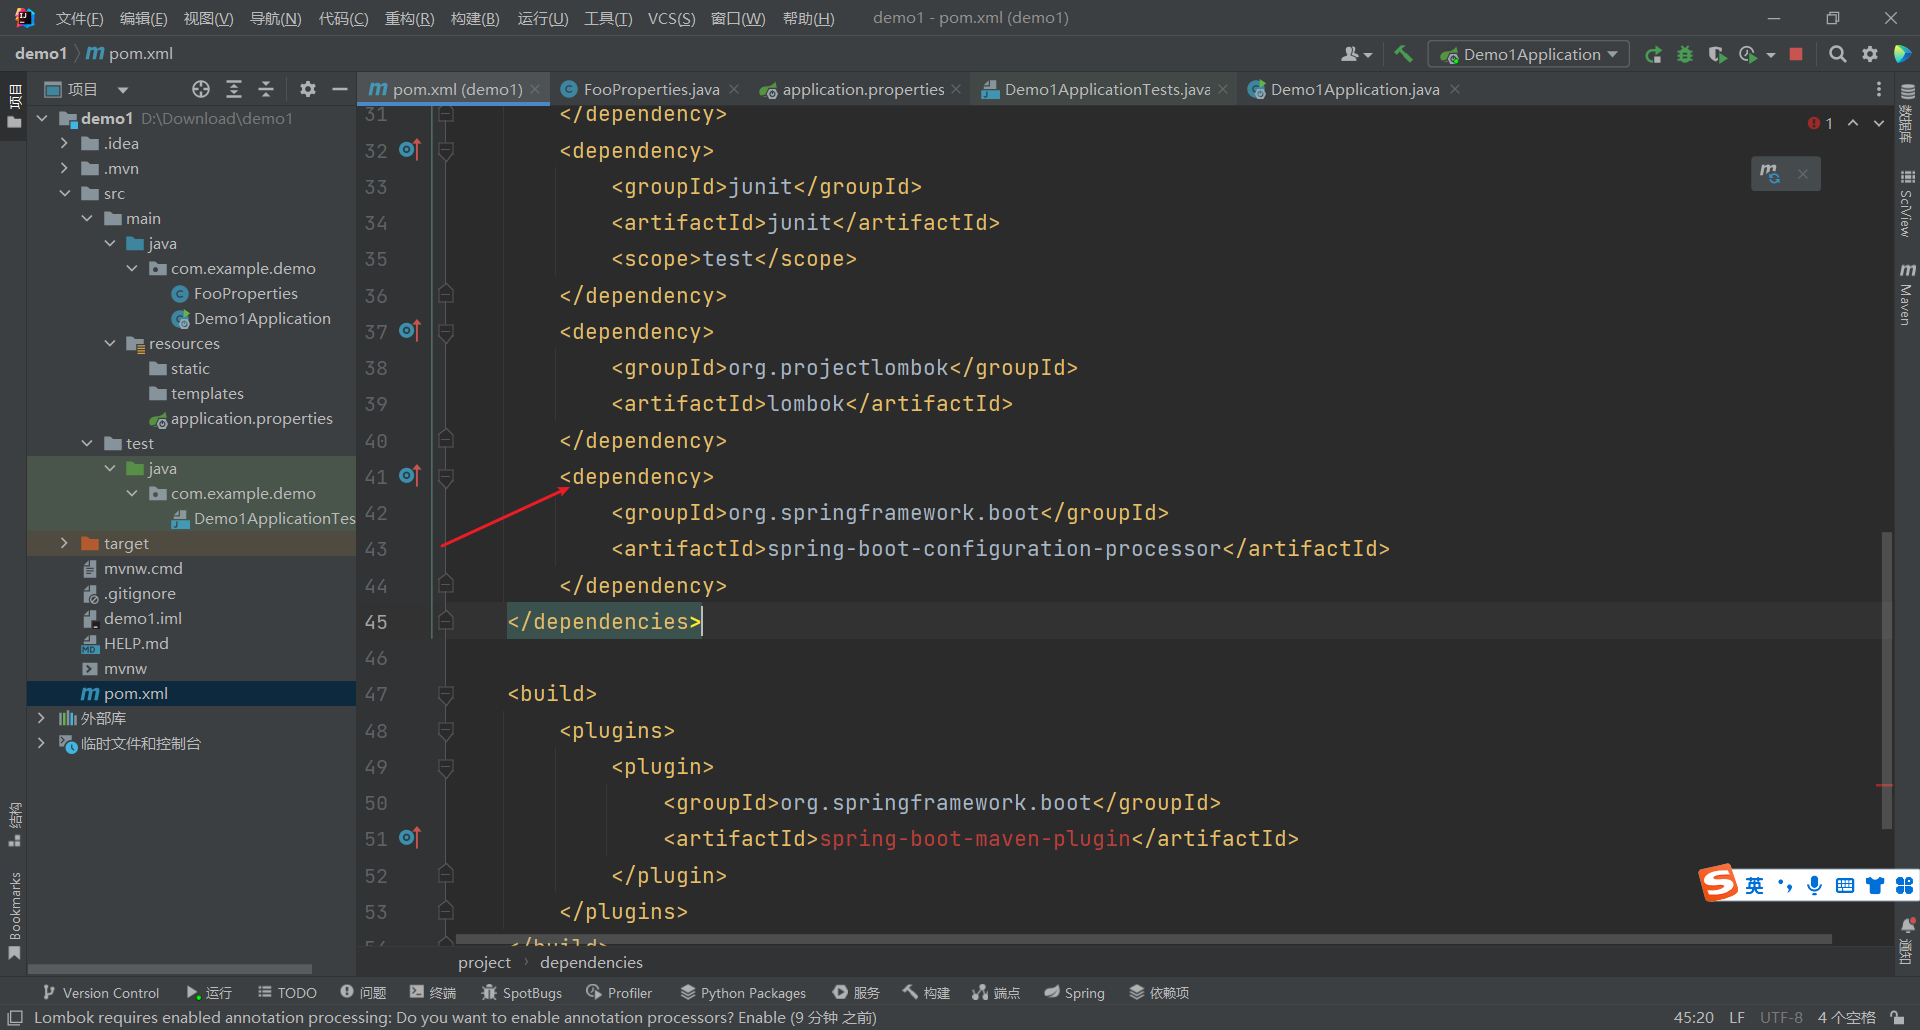
xml中导入自动生成配置的元数据依赖
这样就没有高亮警告了
加密配置中的敏感信息 设置准备加密的配置
datasource.password=wanan
编写输出配置信息的单元测试
package com.example.demo;import lombok.extern.slf4j.Slf4j;import org.junit.jupiter.api.Test;import org.springframework.beans.factory.annotation.Value;import org.springframework.boot.test.context.SpringBootTest;@Slf4j @SpringBootTest public class Demo1ApplicationTests { @Value("${datasource.password:}") private String password; @Test public void test () { log.info("datasource.password : {}" , password); } }
运行以下test()类就可以发现
接着我们开始加密,先添加依赖到pom.xml中
<dependency>
    <groupId>com.github.ulisesbocchio</groupId>
    <artifactId>jasypt-spring-boot-starter</artifactId>
    <version>3.0.3</version>
</dependency>
插件配置
<plugin>
    <groupId>com.github.ulisesbocchio</groupId>
    <artifactId>jasypt-maven-plugin</artifactId>
    <version>3.0.3</version>
</plugin>
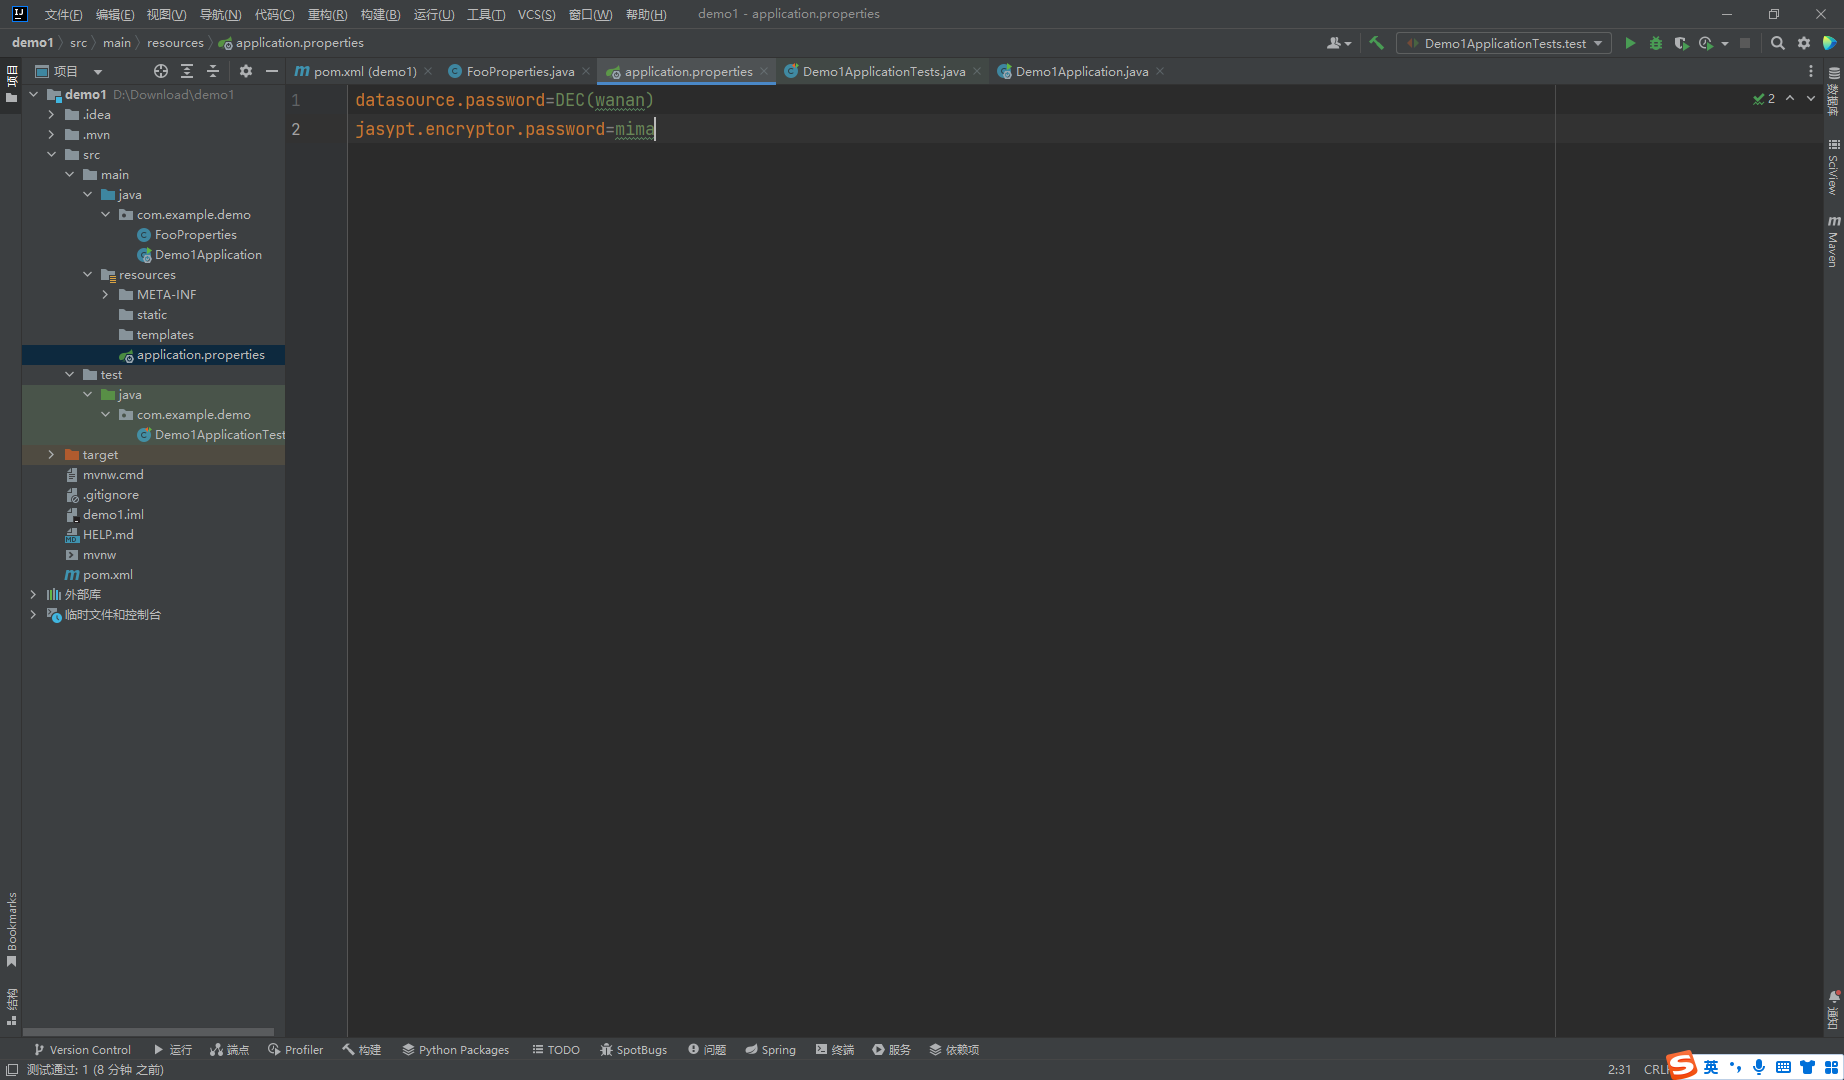
在配置文件中,加入加密需要使用的密码
jasypt.encryptor.password=mima
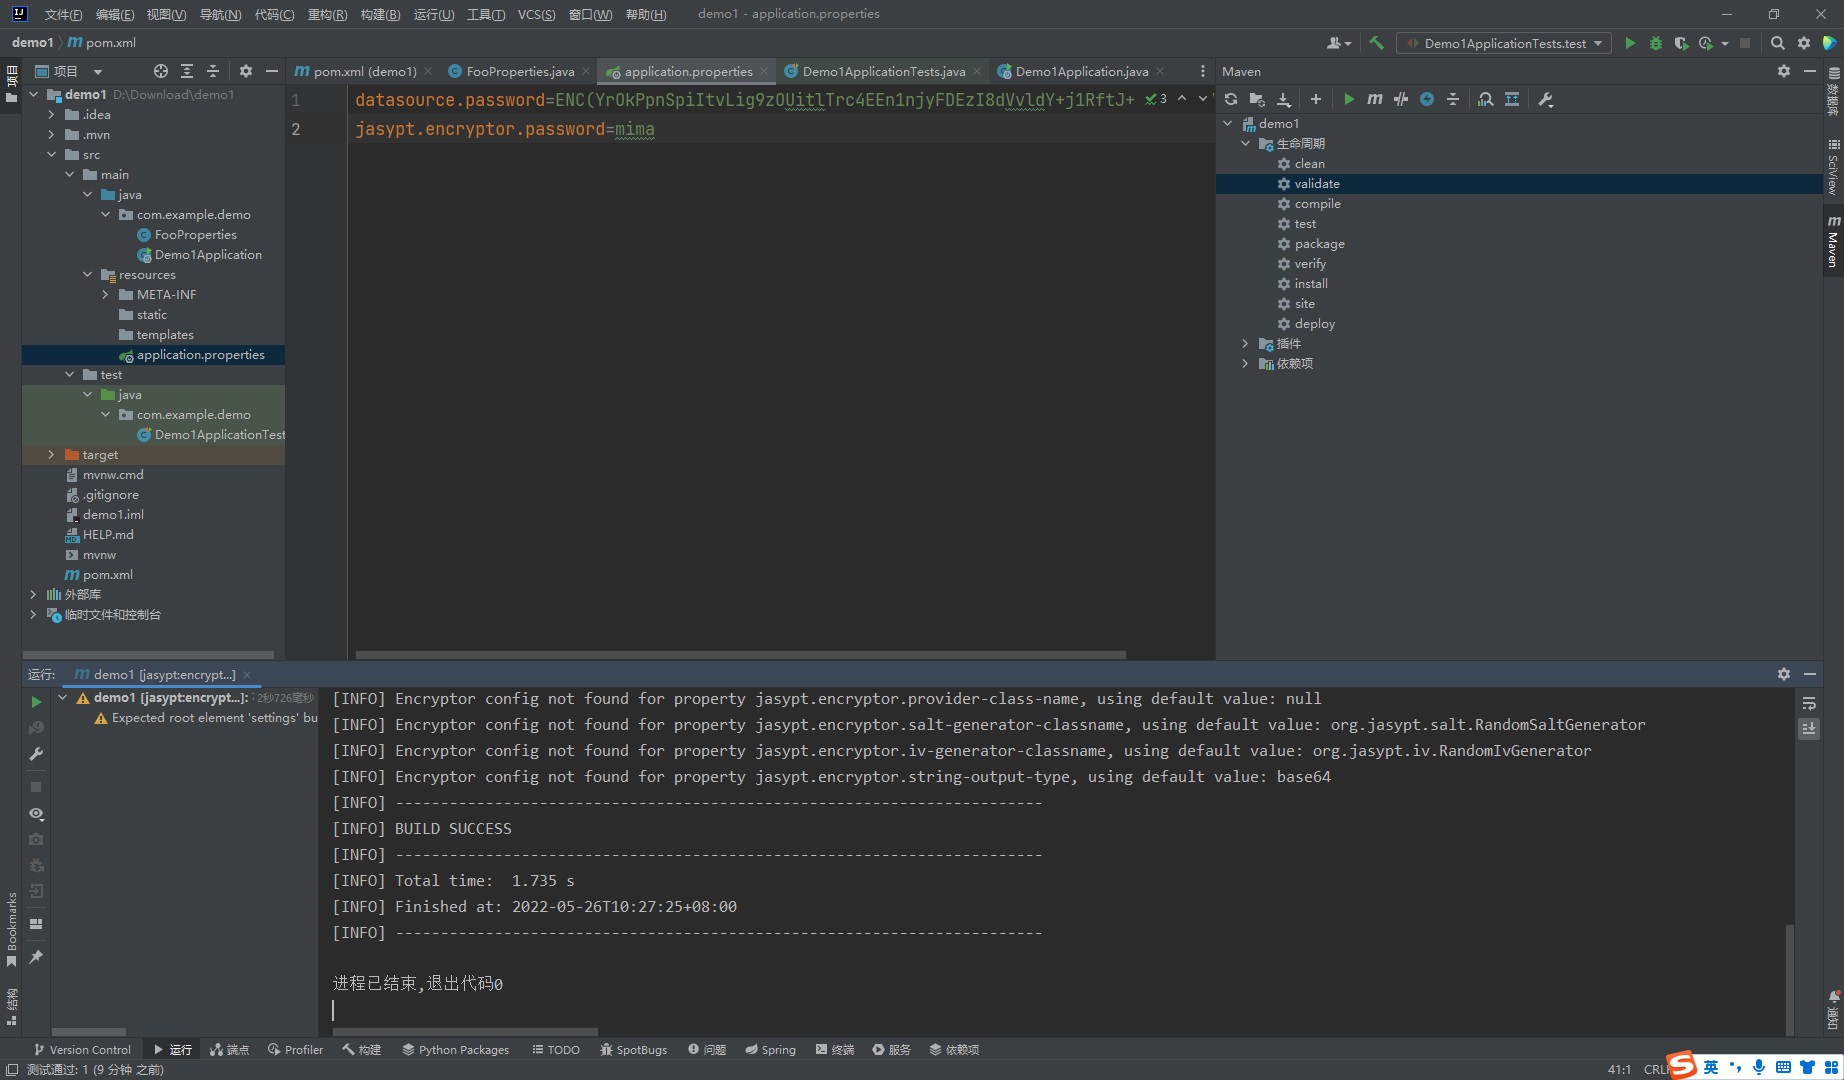
修改要加密的内容,用DEC()将待加密的内容包裹起来
datasource.password=DEC(wanan)
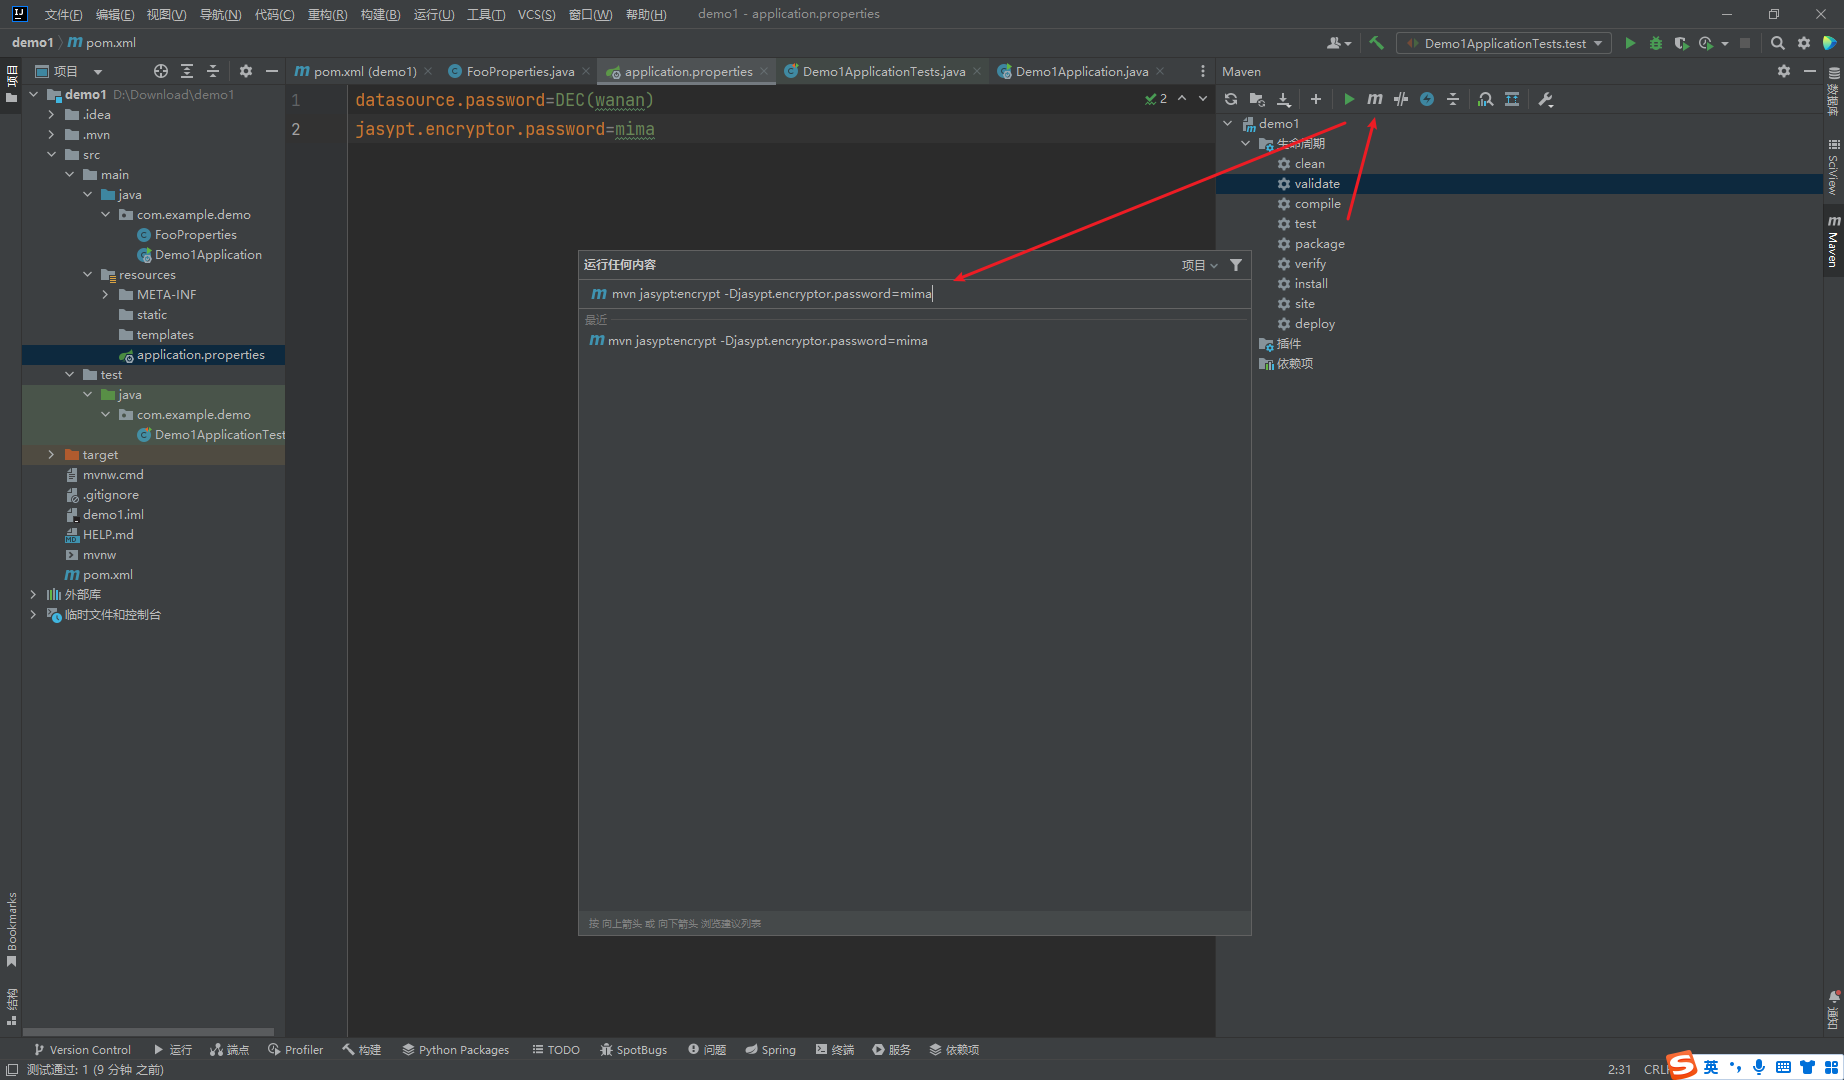
使用jasypt-maven-plugin插件来给DEC()包裹的内容实现批量加密
mvn jasypt:encrypt -Djasypt.encryptor.password=mima
注意这里的-Djasypt.encryptor.password=mima 参数必须与配置文件中的mima中一致,不然后面会解密时候
这里面的ENC()和DEC()一样都是jasypt提供的标识,分别用来标识括号内的是加密后的内容和待加密的内容
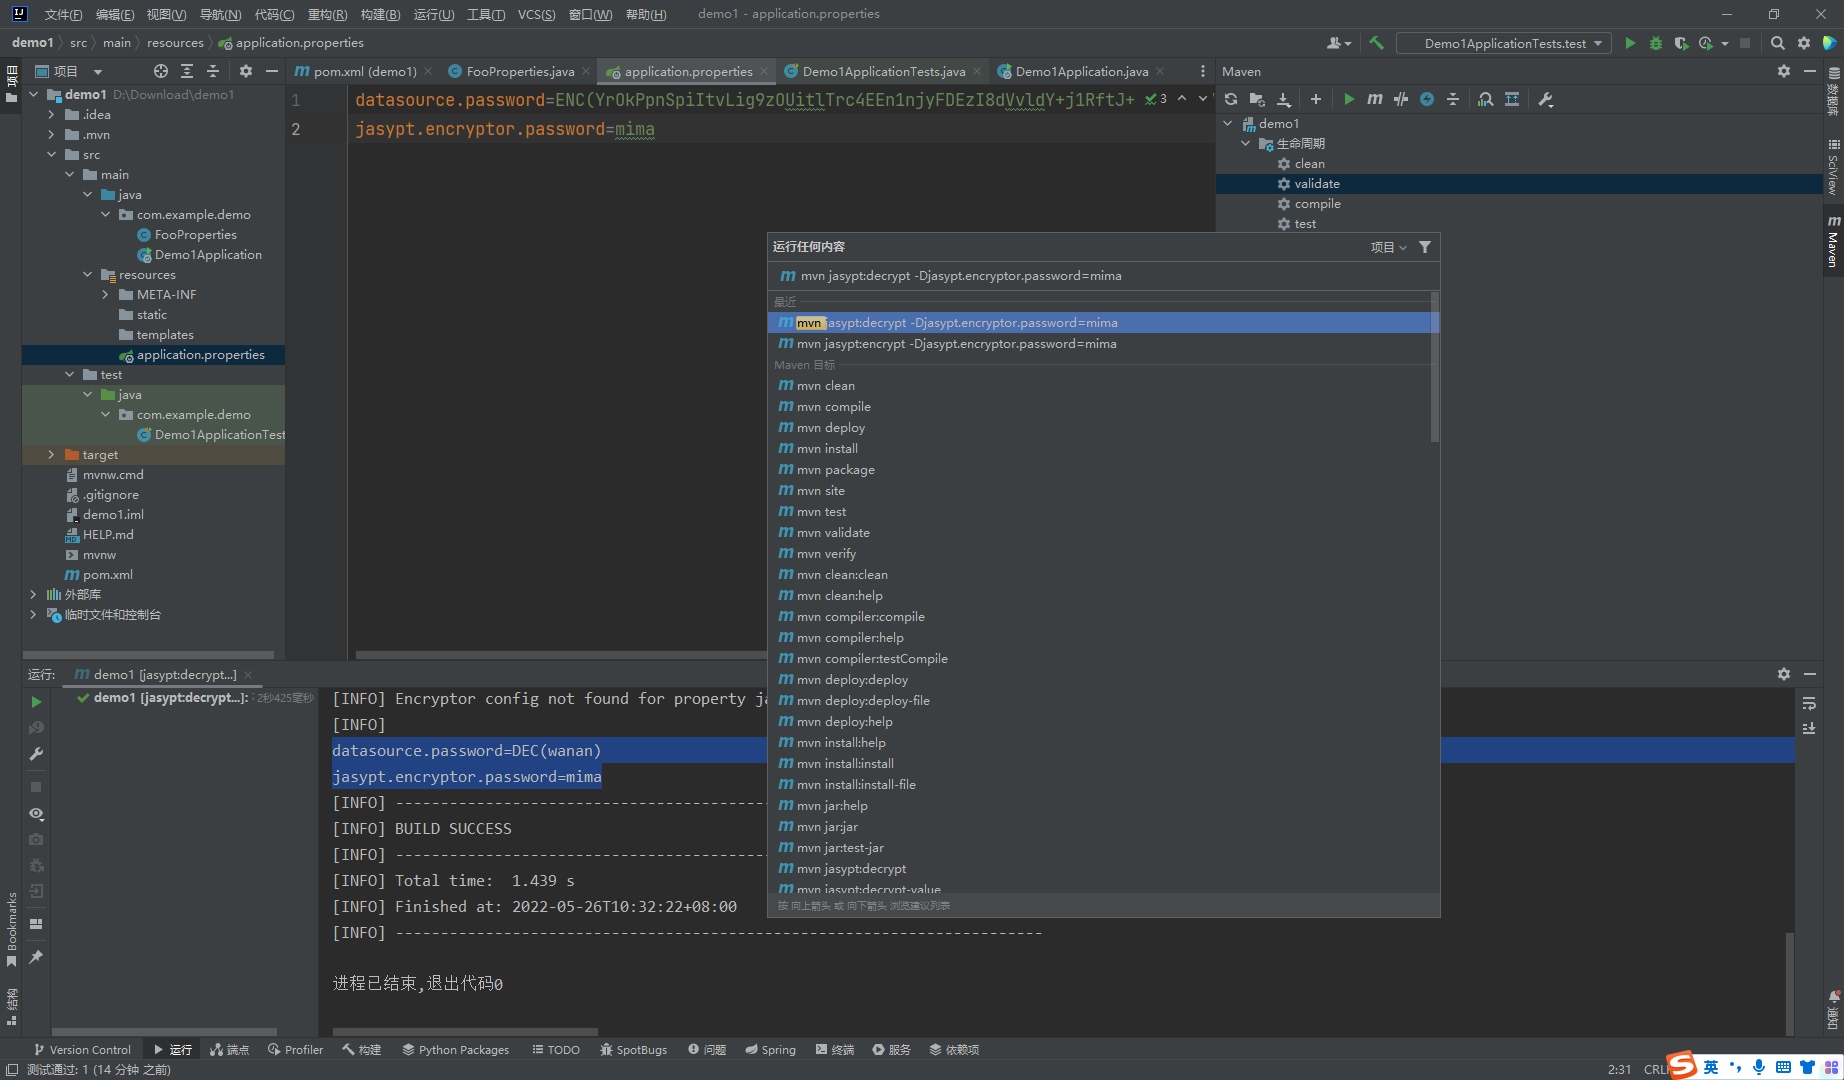
mvn jasypt:decrypt -Djasypt.encryptor.password=mima
再次测试,可以发现输出还是正常的
但是这里的密钥我们还是可以在配置文件中拿到,照样解密就可,那么就相当于没有加密了,但是在实际情况下,我们可以通过环境变量或者启动的参数中注入,而不是写在配置文件中
api开发 构建restful api与单元测试
@Controller 修饰class,用来创建处理http请求的对象
@RestController Spring4之后加入的注解,原来在@Controller中返回json需要@ResponseBody来配合,如果直接使用@RestController代替@Controller就不需要在配置@ResponseBody,默认返回json格式
@RequestMapping 配置url映射.现在更多的也会直接以Http Method直接关联的映射注解来定义,比如 GetMapping PostMapping DeleteMapping PutMapping
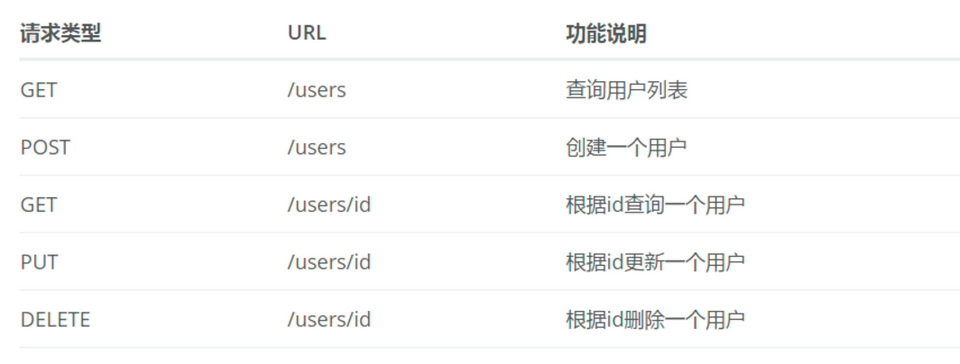
RESTful api设计如下
定义User实体
package com.example.mysp;import lombok.Data;@Data public class User { private Long id; private String name; private Integer age; @Override public String toString () { return "User{" + "id=" + id + ", name='" + name + '\'' + ", age=" + age + '}' ; } public User () { } public User (Long id, String name, Integer age) { this .id = id; this .name = name; this .age = age; } public Long getId () { return id; } public void setId (Long id) { this .id = id; } public String getName () { return name; } public void setName (String name) { this .name = name; } public Integer getAge () { return age; } public void setAge (Integer age) { this .age = age; } }
这里使用@Data注解可以时效内在编译器自动添加set和get函数的效果,该注解是lombok同一个的,需要在pom.xml中引入以下依赖
<dependency>
          <groupId>org.projectlombok</groupId>
          <artifactId>lombok</artifactId>
      </dependency>
编写UserController接口类
package com.example.mysp;import org.springframework.web.bind.annotation.*;import java.util.*;@RestController @RequestMapping(value = "/users") public class UserController { static Map<Long,User> users = Collections.synchronizedMap(new HashMap <Long, User>()); @GetMapping("/") public List<User> getUserList () { ArrayList<User> users1 = new ArrayList <>(users.values()); return users1; } @PostMapping("/") public String postUser (@RequestBody User user) { users.put(user.getId(), user); return "success" ; } @GetMapping("/{id}") public User getUser (@PathVariable Long id) { return users.get(id); } @PutMapping("/{id}") public String putUser (@PathVariable Long id , @RequestBody User user) { User u = users.get(id); u.setName(user.getName()); u.setAge(user.getAge()); users.put(id,u); return "success" ; } @DeleteMapping("/{id}") public String deleteUser (@PathVariable Long id) { users.remove(id); return "success" ; } }
编写单元测试
package com.example.mysp;import org.junit.Before;import org.junit.Test;import org.junit.runner.RunWith;import org.springframework.boot.test.context.SpringBootTest;import org.springframework.http.MediaType;import org.springframework.test.context.junit4.SpringRunner;import org.springframework.test.web.servlet.MockMvc;import org.springframework.test.web.servlet.RequestBuilder;import org.springframework.test.web.servlet.setup.MockMvcBuilders;import static org.hamcrest.Matchers.equalTo;import static org.springframework.test.web.servlet.request.MockMvcRequestBuilders.*;import static org.springframework.test.web.servlet.result.MockMvcResultMatchers.content;import static org.springframework.test.web.servlet.result.MockMvcResultMatchers.status;@RunWith(SpringRunner.class) @SpringBootTest public class MyspApplicationTests { private MockMvc mvc; @Before public void setUp () { mvc = MockMvcBuilders.standaloneSetup(new UserController ()).build(); } @Test public void testUserController () throws Exception{ RequestBuilder request; request = get("/users/" ); mvc.perform(request) .andExpect(status().isOk()) .andExpect(content().string(equalTo("[]" ))); request = post("/users/" ) .contentType(MediaType.APPLICATION_JSON) .content("{\"id\":1,\"name\":\"test\",\"age\":20}" ); mvc.perform(request) .andExpect(content().string(equalTo("success" ))); request = get("/users/" ); mvc.perform(request) .andExpect(status().isOk()) .andExpect(content().string(equalTo("[{\"id\":1,\"name\":\"test\",\"age\":20}]" ))); request = put("/users/1" ) .contentType(MediaType.APPLICATION_JSON) .content("{\"name\":\"test2\",\"age\":30}" ); mvc.perform(request) .andExpect(content().string(equalTo("success" ))); request = get("/users/1" ); mvc.perform(request) .andExpect(content().string(equalTo("{\"id\":1,\"name\":\"test2\",\"age\":30}" ))); request = delete("/users/1" ); mvc.perform(request) .andExpect(content().string(equalTo("success" ))); request = get("/users/" ); mvc.perform(request) .andExpect(status().isOk()) .andExpect(content().string(equalTo("[]" ))); } }
这里的测试类采用的@RunWith(SpringRunner.class)和@SpringBootTest修饰启动; 由于POST和PUT接口的参数采用@RequestBody注解,所以提交的会是一个json字符串,而不是之前的参数信息,这里在定义请求的时候使用contentType(MediaType.APPLICATION_JSON)指定内容为json格式,使用content传入要提交的json字符串,如果使用ModelATTribute的话就得用param方法添加参数.
使用swagger2构建强大的api文档 整合swagger2
在pom.xml中添加依赖,这里要注意版本问题由于spring-boot-starter-parent版本与swagger-spring-boot-starter可能会不匹配,所以需要降版本
<parent>
        <groupId>org.springframework.boot</groupId>
        <artifactId>spring-boot-starter-parent</artifactId>
        <version>2.5.6</version>
        <relativePath/> <!-- lookup parent from repository -->
    </parent>
<dependency>
			<groupId>com.spring4all</groupId>
			<artifactId>swagger-spring-boot-starter</artifactId>
			<version>1.9.0.RELEASE</version>
		</dependency>
应用主类中添加@EnableSwagger2注解
package com.example.demo;import org.springframework.boot.SpringApplication;import org.springframework.boot.autoconfigure.SpringBootApplication;import springfox.documentation.swagger2.annotations.EnableSwagger2;@EnableSwagger2 @SpringBootApplication public class Demo2Application { public static void main (String[] args) { SpringApplication.run(Demo2Application.class, args); } }
在application.properties中配置文档相关内容
swagger.title =spring-boot-starter-swagger swagger.description =Starter for swagger 2.x swagger.version =1.4.0.RELEASE swagger.license =Apache License, Version 2.0 swagger.licenseUrl =https://www.apache.org/licenses/LICENSE-2.0.html swagger.termsOfServiceUrl =https://github.com/dyc87112/spring-boot-starter-swagger swagger.contact.name =didi swagger.contact.url =http://blog.didispace.com swagger.contact.email =dyc87112@qq.com swagger.base-package =com.didispace swagger.base-path =/**
swagger.title 标题
swagger.description 描述
swagger.version 版本
swagger.license 许可证
swagger.licenseUrl 许可证url
swagger.termsOfServiceUrl 服务条款url
swagger.contact.name 维护人
swagger.contact.url 维护人url
swagger.contact.email 维护人email
swagger.base-package swagger扫描的基础包,默认 全扫描
swagger.base-path 需要处理的基础url规则,默认/**
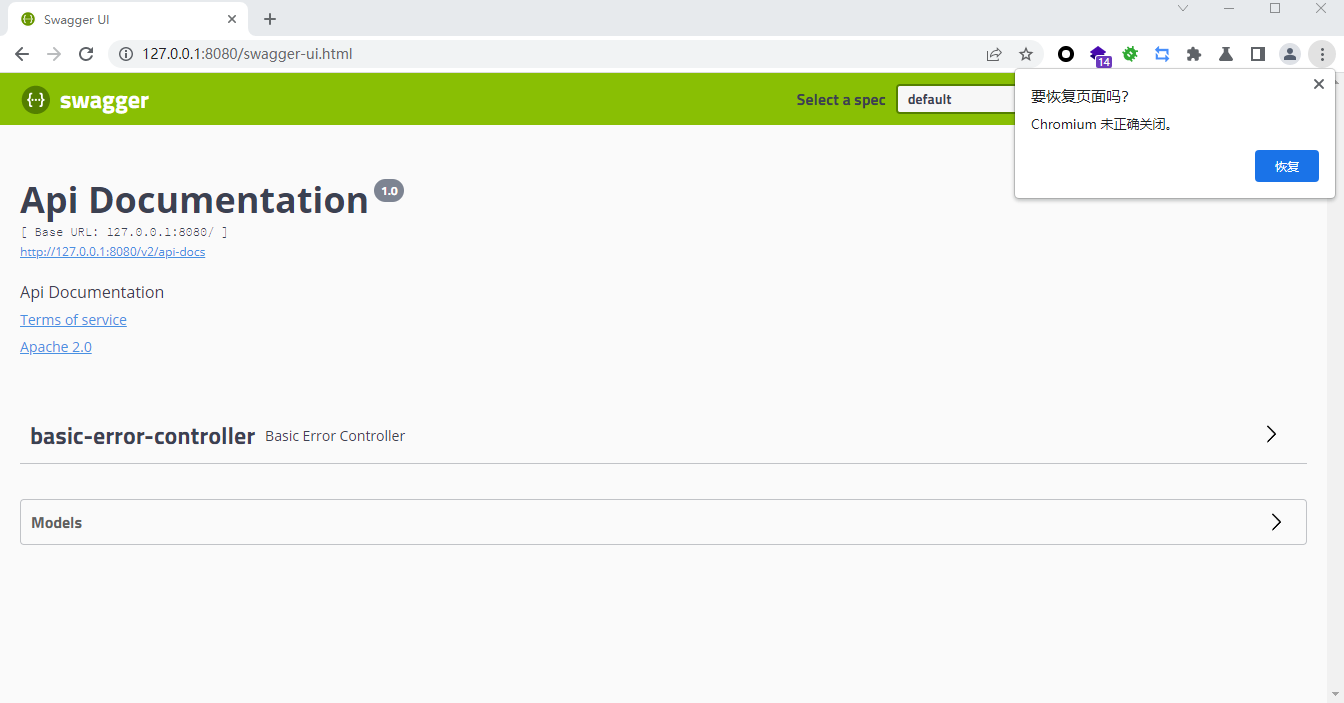
访问
http://127.0.0.1:8080/swagger-ui.html
这里我们可以看到关于各个接口的描述还都是英文或者遵循代码定义的名称产生的,这些内容对用户并不友好,所以我们需要自己添加一些说明来丰富文档内容.我们通过@api,@apioperation注释来给api增加说明,通过@apiimplicitparam @apimodel @apimodelproperty注释来给参数增加说明
package com.didispace.chapter22;import io.swagger.annotations.ApiModel;import io.swagger.annotations.ApiModelProperty;import lombok.Data;@Data @ApiModel(description="用户实体") public class User { @ApiModelProperty("用户编号") private Long id; @ApiModelProperty("用户姓名") private String name; @ApiModelProperty("用户年龄") private Integer age; }
package com.example.demo;import io.swagger.annotations.Api;import io.swagger.annotations.ApiImplicitParam;import io.swagger.annotations.ApiOperation;import org.springframework.web.bind.annotation.*;import java.util.*;@Api(tags = "用户管理") @RestController @RequestMapping(value = "/users") public class UserController { static Map<Long , User> users = Collections.synchronizedMap(new HashMap <>()); @GetMapping("/") @ApiOperation(value = "获取用户列表") public List<User> getUserList () { List<User> r = new ArrayList <>(users.values()); return r; } @PostMapping("/") @ApiOperation(value = "创建用户", notes = "根据User对象创建用户") public String postUser (@RequestBody User user) { users.put(user.getId(), user); return "success" ; } @GetMapping("/{id}") @ApiOperation(value = "获取用户详细信息",notes = "根据url的id来获取用户的详细信息") public User getUser (@PathVariable Long id) { return users.get(id); } @PutMapping("/{id}") @ApiImplicitParam(paramType = "path", dataType = "Long", name = "id", value = "用户编号", required = true, example = "1") @ApiOperation(value = "更新用户详细信息", notes = "根据url的id来指定更新对象,并根据传过来的user信息来更新用户详细信息") public String putUser (@PathVariable Long id, @RequestBody User user) { User u = users.get(id); u.setName(user.getName()); u.setAge(user.getAge()); users.put(id, u); return "success" ; } @DeleteMapping("/{id}") @ApiOperation(value = "删除用户",notes = "根据url的id来指定删除对象") public String deleteUser (@PathVariable Long id) { users.remove(id); return "success" ; } }
写完之后重新访问可以发现
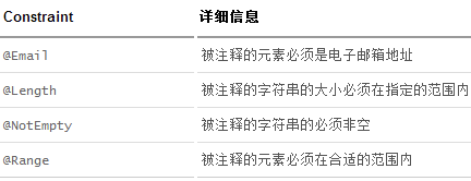
jsr-303 实现请求参数效验 Bean validation中内置的constraint
Hibernate validator附加的constraint
比如要定义字段不能为null
更改依赖
<dependency>
            <groupId>org.springframework.boot</groupId>
            <artifactId>spring-boot-starter-web</artifactId>
            <version>2.0.5.RELEASE</version>
        </dependency>
在校验的字段上添加@NotNull注解
package com.example.demo;import io.swagger.annotations.ApiModel;import io.swagger.annotations.ApiModelProperty;import lombok.Data;import javax.validation.constraints.*;@Data @ApiModel(description="用户实体") public class User { @ApiModelProperty("用户编号") private Long id; @NotNull @ApiModelProperty("用户姓名") private String name; @NotNull @ApiModelProperty("用户年龄") private Integer age; }
在需要效验的参数实体前面添加@Valid注解
package com.example.demo;import io.swagger.annotations.Api;import io.swagger.annotations.ApiImplicitParam;import io.swagger.annotations.ApiOperation;import org.springframework.web.bind.annotation.*;import javax.validation.Valid;import java.util.*;@Api(tags = "用户管理") @RestController @RequestMapping(value = "/users") public class UserController { static Map<Long , User> users = Collections.synchronizedMap(new HashMap <>()); @GetMapping("/") @ApiOperation(value = "获取用户列表") public List<User> getUserList () { List<User> r = new ArrayList <>(users.values()); return r; } @PostMapping("/") @ApiOperation(value = "创建用户", notes = "根据User对象创建用户") public String postUser (@Valid @RequestBody User user) { users.put(user.getId(), user); return "success" ; } @GetMapping("/{id}") @ApiOperation(value = "获取用户详细信息",notes = "根据url的id来获取用户的详细信息") public User getUser (@PathVariable Long id) { return users.get(id); } @PutMapping("/{id}") @ApiImplicitParam(paramType = "path", dataType = "Long", name = "id", value = "用户编号", required = true, example = "1") @ApiOperation(value = "更新用户详细信息", notes = "根据url的id来指定更新对象,并根据传过来的user信息来更新用户详细信息") public String putUser (@PathVariable Long id, @RequestBody User user) { User u = users.get(id); u.setName(user.getName()); u.setAge(user.getAge()); users.put(id, u); return "success" ; } @DeleteMapping("/{id}") @ApiOperation(value = "删除用户",notes = "根据url的id来指定删除对象") public String deleteUser (@PathVariable Long id) { users.remove(id); return "success" ; } }
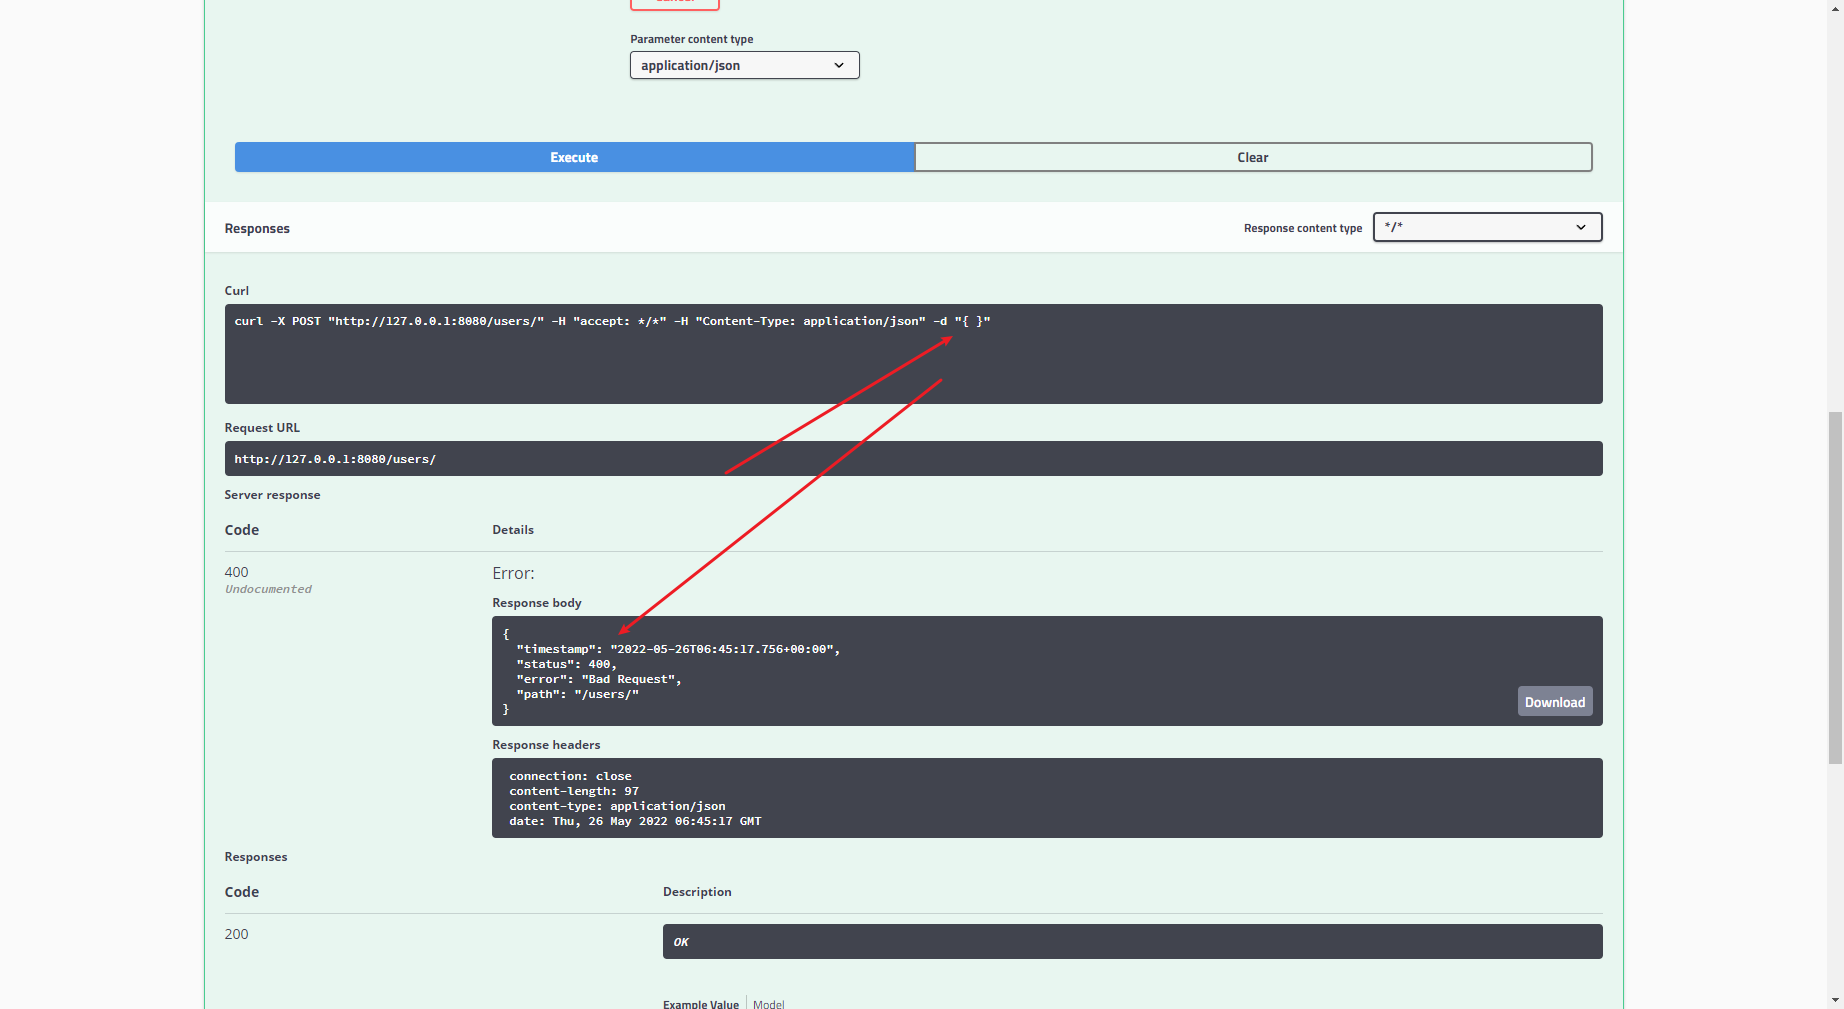
timestamp 请求时间
status http返回的状态码,这里返回400,即请求无效错误的请求,通常参数校验不通过均为400
error http返回的错误描述,这里对应的就是400状态的错误描述 badrequest
errors 具体错误原因
message概要错误消息
添加效验字符串的长度 效验数字的大小 效验字符串格式是否为邮箱等等
package com.example.demo;import io.swagger.annotations.ApiModel;import io.swagger.annotations.ApiModelProperty;import lombok.Data;import javax.validation.constraints.*;@Data @ApiModel(description="用户实体") public class User { @ApiModelProperty("用户编号") private Long id; @NotNull @Size(min = 2,max = 5) @ApiModelProperty("用户姓名") private String name; @NotNull @Max(100) @Min(10) @ApiModelProperty("用户年龄") private Integer age; @NotNull @Email @ApiModelProperty("用户邮箱") private String email; }
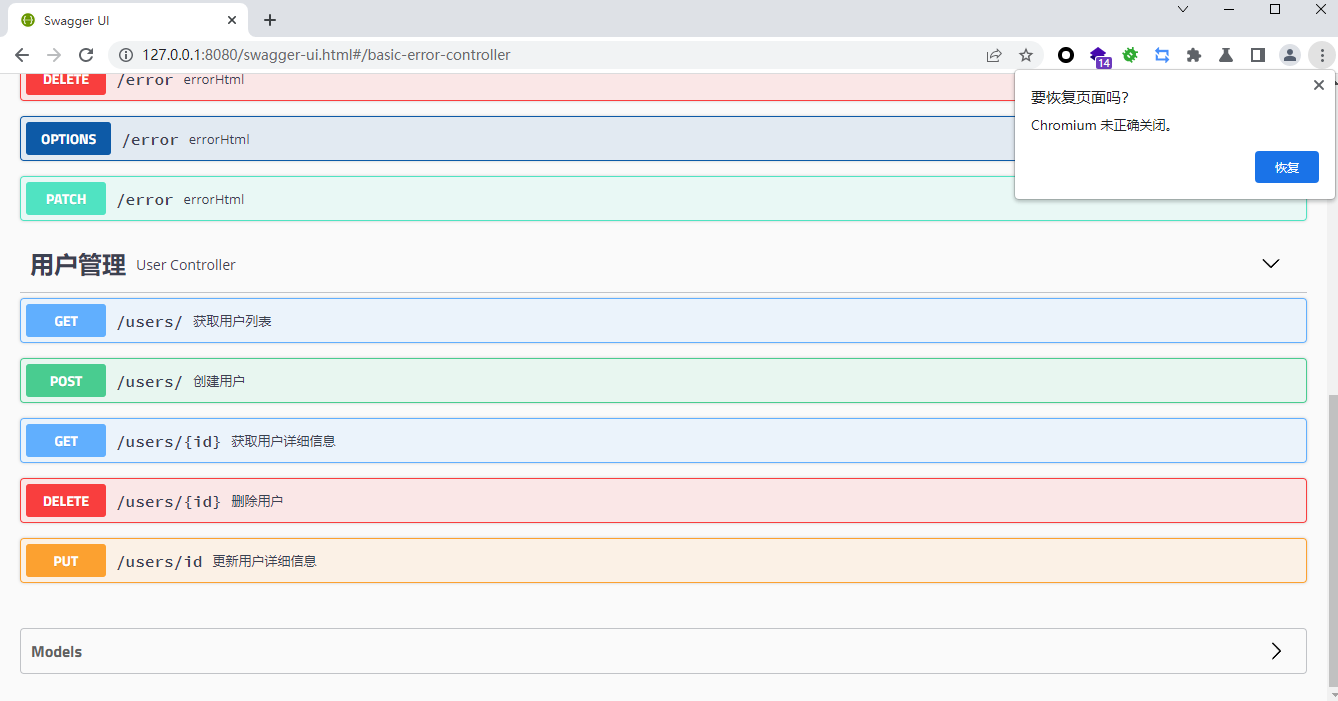
swagger接口分类与各元素排序问题详解 我们在spring boot 中定义的各个接口是以controller作为第一级难度来进行组织的,controller与具体接口之间是一对多的关系.我们可以将同属一个模块的接口定义在一个controller里.默认情况下,swagger是一contrlller为单位,对接口进行分组管理的,这个分组的元素在swagger中称为tag,但是这里的tag与接口的关系不是一对多的,它支持更丰富的多对多关系
定义两个Controller,分别负责教室管理和学生管理接口
package com.example.demo;import io.swagger.annotations.Api;import io.swagger.annotations.ApiOperation;import org.springframework.boot.SpringApplication;import org.springframework.boot.autoconfigure.SpringBootApplication;import org.springframework.web.bind.annotation.GetMapping;import org.springframework.web.bind.annotation.PostMapping;import org.springframework.web.bind.annotation.RequestMapping;import org.springframework.web.bind.annotation.RestController;import springfox.documentation.swagger2.annotations.EnableSwagger2;@EnableSwagger2 @SpringBootApplication public class Demo2Application { public static void main (String[] args) { SpringApplication.run(Demo2Application.class, args); } @RestController @RequestMapping(value = "/teacher") static class TeacherController { @GetMapping("/xxx") public String xxx () { return "xxx" ; } } @RestController @RequestMapping(value = "/student") static class StudentController { @ApiOperation("获取学生清单") @GetMapping("/list") public String bbb () { return "bbb" ; } @ApiOperation("获取教某个学生的老师清单") @GetMapping("/his-teachers") public String ccc () { return "ccc" ; } @ApiOperation("创建一个学生") @PostMapping("/aaa") public String aaa () { return "aaa" ; } } }
可以看到默认的tag名字是student-comtroller
package com.example.demo;import io.swagger.annotations.Api;import io.swagger.annotations.ApiOperation;import org.springframework.boot.SpringApplication;import org.springframework.boot.autoconfigure.SpringBootApplication;import org.springframework.web.bind.annotation.GetMapping;import org.springframework.web.bind.annotation.PostMapping;import org.springframework.web.bind.annotation.RequestMapping;import org.springframework.web.bind.annotation.RestController;import springfox.documentation.swagger2.annotations.EnableSwagger2;@EnableSwagger2 @SpringBootApplication public class Demo2Application { public static void main (String[] args) { SpringApplication.run(Demo2Application.class, args); } @Api(tags = "教师管理") @RestController @RequestMapping(value = "/teacher") static class TeacherController { @GetMapping("/xxx") public String xxx () { return "xxx" ; } } @Api(tags = "学生管理") @RestController @RequestMapping(value = "/student") static class StudentController { @ApiOperation("获取学生清单") @GetMapping("/list") public String bbb () { return "bbb" ; } @ApiOperation("获取教某个学生的老师清单") @GetMapping("/his-teachers") public String ccc () { return "ccc" ; } @ApiOperation("创建一个学生") @PostMapping("/aaa") public String aaa () { return "aaa" ; } } }
@Api(tags = {"教师管理", "教学管理"}) @RestController @RequestMapping(value = "/teacher") static class TeacherController { } @Api(tags = {"学生管理", "教学管理"}) @RestController @RequestMapping(value = "/student") static class StudentController { }
更细颗粒的接口分组
通过@Api可以实现将controller中的接口合并到一个Tag中,但是如果我们希望精确到某个接口的合并,比如教学管理包含教师管理中的所有接口以及学生管理 中的获取学生清单接口
这个时候我们可以通过使用@Apioperation注解中的tags属性做更细颗粒度的分类定义
Api(tags = {"教师管理" ,"教学管理" }) @RestController @RequestMapping(value = "/teacher") static class TeacherController { @ApiOperation(value = "xxx") @GetMapping("/xxx") public String xxx () { return "xxx" ; } } @Api(tags = {"学生管理"}) @RestController @RequestMapping(value = "/student") static class StudentController { @ApiOperation(value = "获取学生清单", tags = "教学管理") @GetMapping("/list") public String bbb () { return "bbb" ; } @ApiOperation("获取教某个学生的老师清单") @GetMapping("/his-teachers") public String ccc () { return "ccc" ; } @ApiOperation("创建一个学生") @PostMapping("/aaa") public String aaa () { return "aaa" ; }
swagger静态文档的生成 SwaggerMarkup主要用来将swagger自动生成的文档转换成几种流行的格式以便于静态部署和使用
添加依赖
<dependencies > ... <dependency > <groupId > io.github.swagger2markup</groupId > <artifactId > swagger2markup</artifactId > <version > 1.3.3</version > <scope > test</scope > </dependency > </dependencies > <repositories > <repository > <snapshots > <enabled > false</enabled > </snapshots > <id > jcenter-releases</id > <name > jcenter</name > <url > http://jcenter.bintray.com</url > </repository > </repositories >
package com.example.demo;import io.swagger.annotations.ApiModel;import io.swagger.annotations.ApiModelProperty;import lombok.Data;import javax.validation.constraints.NotNull;@Data @ApiModel(description="用户实体") public class User { @ApiModelProperty("用户编号") private Long id; @NotNull @ApiModelProperty("用户姓名") private String name; @NotNull @ApiModelProperty("用户年龄") private Integer age; }
package com.example.demo;import io.swagger.annotations.Api;import io.swagger.annotations.ApiImplicitParam;import io.swagger.annotations.ApiOperation;import org.springframework.web.bind.annotation.*;import java.util.*;@Api(tags = "用户管理") @RestController @RequestMapping(value = "/users") public class UserController { static Map<Long, User> users = Collections.synchronizedMap(new HashMap <>()); @GetMapping("/") @ApiOperation(value = "获取用户列表") public List<User> getUserList () { List<User> r = new ArrayList <>(users.values()); return r; } @PostMapping("/") @ApiOperation(value = "创建用户", notes = "根据User对象创建用户") public String postUser (@RequestBody User user) { users.put(user.getId(), user); return "success" ; } @GetMapping("/{id}") @ApiOperation(value = "获取用户详细信息", notes = "根据url的id来获取用户详细信息") public User getUser (@PathVariable Long id) { return users.get(id); } @PutMapping("/{id}") @ApiImplicitParam(paramType = "path", dataType = "Long", name = "id", value = "用户编号", required = true, example = "1") @ApiOperation(value = "更新用户详细信息", notes = "根据url的id来指定更新对象,并根据传过来的user信息来更新用户详细信息") public String putUser (@PathVariable Long id, @RequestBody User user) { User u = users.get(id); u.setName(user.getName()); u.setAge(user.getAge()); users.put(id, u); return "success" ; } @DeleteMapping("/{id}") @ApiOperation(value = "删除用户", notes = "根据url的id来指定删除对象") public String deleteUser (@PathVariable Long id) { users.remove(id); return "success" ; } }
spring boot ./env https://www.jianshu.com/p/ae4be3af5231
https://www.jianshu.com/p/8c18f1e05c94


 微信
微信 支付宝
支付宝

